Google Search Console earlier known as Google Webmaster Tools and before that it was called Google Webmaster Central.
In 2015 Google rebranded it to make it more user-friendly and since then it is called Google Search Console. Or GSC in short. But all of these terms are in use even today, people still call it Google Webmaster Tools or Webmaster Tools.
What is Google Search Console?
It is a free service that Google offers to the website owners. It helps website owners and digital marketers evaluate and maintain their website’s performance in Google search results.
Google Search Console is a great resource for information. It offers insights into how it sees your website and help you find the issues and fix them. Fixing the issues help you comply with Google’s guidelines and get a better rank in search engine results.
Using or registering in Google Search Console is not mandatory. You don’t need to do it just to make your website appear in Google search results. But, Digital Marketer’s recommend it because it offers valuable information that can help you improve your marketing efforts.
We will be discussing in detail how you can use the Google Search Console’s data to improve your website’s performance, but before that let’s see how Google Search Console helps you monitor your website’s performance and how to set up your Google Search Console for your web properties like Websites and Android Apps.
GSC gives you data such as app indexing errors, website page indexing, errors, search queries, backlinks, etc. It also helps to see the search analytics reports for your Android Apps.
How Google Search Console Helps You, Monitor, & Improve Your Website‘s Performance?
- It verifies that Google can access the content on your website. And the search bots can crawl your website content you allow for crawling and indexing by the search engine results.
- With Google Search Console you can submit new pages and posts for Google to crawl.
- You can remove content you don’t want search engine users to discover with the help of GSC and Robots.txt file.
- You can fix the errors on your website without disrupting its presence in search results.
- It also helps you find and remove malware or spam problems that may not be easily traced through other means.
- Google Search Console tells you the most popular queries making your website appear in search results.
- You can find out which queries are driving the most traffic on your website or Android App.
- With Google Search Console you can see which websites are linking to yours or giving you a backlink.
- You can evaluate how well your mobile website is performing for people searching on tablets and phones.
How to Set Up Google Search Console?
To use the features and access Google Search Console data, you have to verify that you are the owner, or authorized representative, of the website or the Android App for which you want to access the data.
Below is the step by step method for setting up the Google Search Console for Websites and Android Apps.
Adding Your Website
To start things off, you’ll need to set up a free account with Google Search Console. Then you’ll need to verify that you actually own the site you’re going to analyze. Start by clicking the “add property” button on the left-hand dropdown.
From there, just enter your website name. Remember that it’s a strict entry, meaning http: and https: are counted as different sites.
Next, you’ll need to verify that you own the site. Google provides a few different ways of doing this.
Google Search Console Setup for Websites
There are five ways you can set up and verify your website. You can choose any one of the options which you think is easy for you.
Uploading an HTML File
GSC gives you a .html file that you have to upload to the root directory of your website. The file itself is blank. Its only purpose is to prove that you have access to the website’s FTP server or the cPanel. And you can drop files where they need to go to prove your ownership of the website.
Once the file goes into the root directory, you just need to click on the “verify” button in GSC. Once done you will have access to the Google Search Console data related to your website.
Note that GSC starts capturing the data for your website from the day you verify your ownership of the website. It won’t show you data before your verification.
Adding an HTML Tag
You can also verify your website in Google Search Console by adding a meta tag provided by Google. For that, you need to drop it into the header of your homepage.
Once this is in place, click on the “verify” button to view data. It’s important to note that sometimes homepage code can be challenging to find with certain content management system (CMS) themes, particularly WordPress.
It is also possible that your code disappears when you update your homepage, revoking your access to Google Search Console data until the tag is replaced. So, keep this in mind if you choose this method to verify your website with Google Search Console.
Select the Provider of Your Domain
Google gives you the option of selecting your domain name provider in a drop-down list. Click on your provider, and Google will walk you through the steps of verifying your website.
Use Google Analytics
As the administrator of your website’s Google Analytics account, you can verify the website using an asynchronous tracking code placed in the head of your homepage.
Using this method is easy. And also it syncs both your Google Search Console and Google Analytics to give you better analytics about your website.
Using Google Tag Manager
This is a tool that allows you to enter and manage all the tracking tags for your website, including GSC.
Google Search Console Setup for Android Apps
There are two ways to verify an Android app:
Verify as Owner of the Android App
If you have Google Play Management Rights on the app and you are logged in with that account in Search Console(where management rights mean permission to manage public APKs or public listings): Add a new property in Search Console for your app. Specify the app root URI using the format android-app://{package_name}/ with a trailing slash.
Example: android-app://com.example/. Search Console will verify that your account is the same as the app owner’s Google Play account, and automatically verify the app property in Search Console.
Note: If your Search Console account is not the same as your Google Play account, you cannot use automatic verification.
Get Permission from the App Owner
Ask an owner of the verified app property on the Search Console to add you as an owner or user of the app property.
PS: It can take up to 48 hours to verify an Android app.
Once your GSC account is set up and your website is verified, you will have access to plenty of actionable data that can help you optimize your website well.
You can also choose to receive alerts from Google, adjust settings to deliver specific information to your inbox, submit XML sitemaps, and view user queries where your website appeared in search.
If you would learn the basics of using GSC, you will have a great resource. Based on the GSC data you can make your future marketing decisions.
Recently Google started to migrate important data which helped the website owners and digital marketers in optimizing their websites for search engines to the new Search Console.
This new version of the Search Console is basically the improved version of the old version. It has a simple user interface than the previous one.
But the new version can’t replace the old one just yet. If you want to go back to the old version of the Google Search Console you can easily switch back using the button at the left bottom of the dashboard. If you’re not verified to access Google Search Console, do it now and have the access to the critical and valuable information found nowhere else.
Access to Data Dashboard
Once your website is verified in Google Search Console you’ll start seeing data about your website on the dashboard in GSC.
In some cases, it might take a couple of hours before you see any data, but have patience and check back in a few hours to see your website data.
The dashboard shows a lot of options and a simple linear graph showing the performance of your website on the impressions and clicks.
You can also explore other options like an overview, performance, URL inspection, Coverage, Sitemaps, Mobile Usability, Links, Settings, an option to go back to the old version of the GSC in the left panel and graph charts of Performance, Coverage, and Enhancements.
Overview
In the Google Search Console dashboard, the Overview graph shows you a linear graph showing total web search clicks for three previous months from the current date under the heading “Performance”. To see the complete detail on search clicks and impressions of your keywords Click on “Open Report” on the right side of the overview graph panel.
URL Inspection
With URL inspection, you can explore any single URL of your website. Just type it into the search bar at the top of the screen, and you’ll be presented with a quick report on how Google sees the URL. Below is an example:
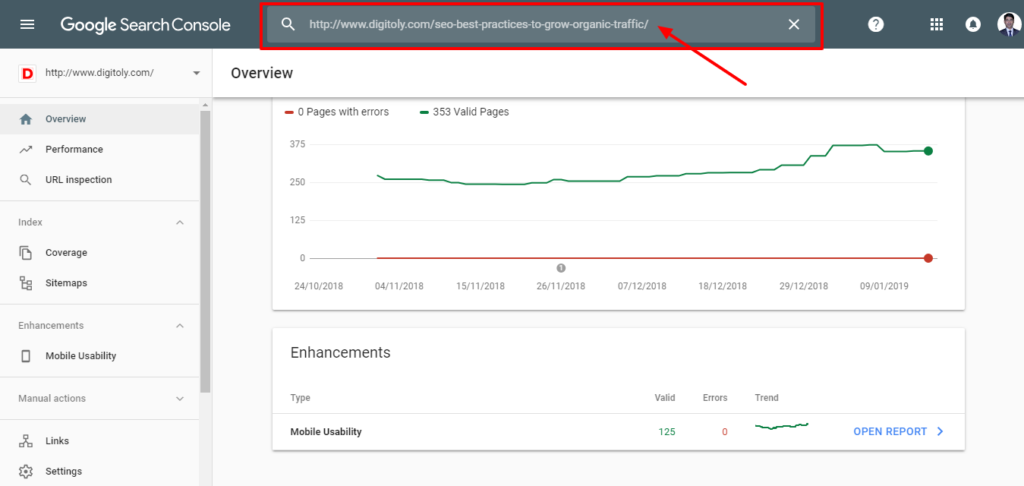
I entered an URL from my website, as you can see in the search box marked in the red color. And it will show the results for this page which is as follows:

The result page shows that the URL is successfully crawled by Google bots and have no errors.
Index
This section of the Google Search Console will show you crawl status and error reports of your websites. It will show you how many URLs of your website have been successfully crawled and how many are excluded, how many have an error due to which Google has not crawled them, etc.
You can quickly see which URLs have the error and after fixing them you can resubmit them for Google to crawl. This will help you do everything as per Google’s guidelines and get a better rank for your website.
Coverage
There will be some pages on your website that you just don’t want Google to index like the private login areas, RSS feeds, or crucial data that you don’t want people to access or Google to crawl them to show in the search engines.
In the coverage tab, you can see a basic report of pages on your website. There are few other tabs that show pages with an error, valid with warnings, valid and excluded.
You can block the pages which you don’t want Google and other search engines to crawl by creating a robots.txt file and disallowing the page you choose not to be crawled.
Through a robots.txt generator and tester, not only will you be able to create a robots.txt file, but you will be able to see if it is done correctly before you upload it to your server.
Here’s is a quick link to get Google’s help in creating and testing your robots.txt file.
Sitemaps
The next tab is known as “sitemaps”. Here you can submit the .xml file of your sitemap. A sitemap is basically a “table of contents” for your site or you can say a complete directory of every URL on your website.
Submitting this file in Google Search Console makes it easy for Google bots to find every page on your site and understand its hierarchy. This helps Google determine what pages you have on your website and then Google indexes them in their directories.
It is not compulsory to submit your sitemap, but if you don’t do that, Google bots might not be able to find every link on your website and you may risk non-indexing of few important pages in Google directories, which means you won’t get traffic for the pages which are not indexed.
The maximum number of URLs one sitemap can contain is 50,000 and if you have more than 50,000 pages on your website you can submit multiple .xml files for Google to crawl and index.
Create Your XML Sitemaps
If you don’t know how to do it, you can use XML Sitemaps to create a sitemap for your website. You just need to enter URL of your homepage and click “start”. Once your sitemap is ready you can upload it to Google Search Console.
Once you submit your sitemaps to Google Search Console, Google will tell you how many of your URLs are indexed. You may see that all of your URLs are not indexed at once.
But, you don’t need to worry. It is common for Google Search Console to not index all of your web pages at once. But you should try to get as many pages indexed as possible.
Usually, Google Search Console doesn’t index pages that don’t have unique content, generic title tags, and meta descriptions.
Linking your pages internally helps Google Bots to crawl the links used in the pages as well. So, try to link your pages internally to maximize your chances of getting all your website pages crawled and indexed.
Enhancements
Right now, the only option under “Enhancements” is “Mobile Usability.”
This tab shows you how many pages on your website are mobile-friendly and indexed in Google directories to show on mobile devices.
You can also see and fix the errors on your pages if they are not been shown in mobile searches from this tab.
Manual Actions
This is a very useful tab as it shows the spam reports about your website. If someone on the internet marks your website as Spam that report would be shown here.
You can fix this by manually reviewing the request and then re-submitting it to Google for crawling and indexing again.
If you see “No issues detected” notification on this page, you need not do anything and everything on your website is fine.
Links
This is quite an important tab and shows you data which is of great value. This shows the internal and external links sections.
The Links report shows which sites and pages link to your pages internally and externally.
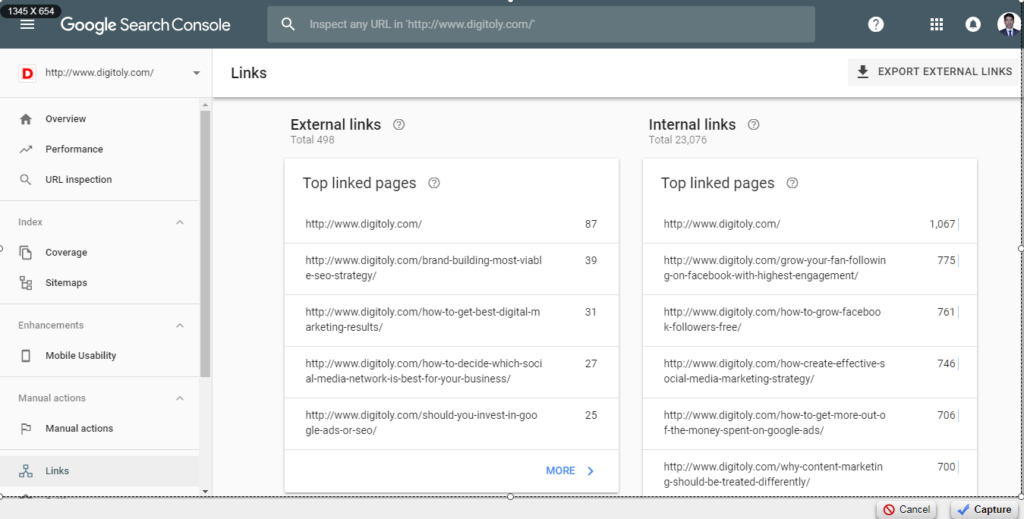
The first two reports show both labeled “Top linked pages. The one on the left, under “External links,” shows which pages have the most links to them from external websites.
Whereas, the report on the right, under “Internal links” shows your top pages with internal links, means, which pages receive links from other pages on your site.
This section also contains a couple more external link reports. Like the “Top linking sites” shows which sites link most heavily to yours.
The “Top linking text” report shows the link text most commonly used when other sites link to yours. The most common text you might see under this section is your company or website name.
This is because websites linking to your website refer to your website by its name.
But if you click on the “More” into the report, you have the option to filter the link text for certain keywords — just click on the upside-down triangle and “link text.”
Then type a word or phrase where it says “Filter by Link text.”
Settings
Under this tab, you will find information on the verification status of your domain. Also, you can see the detail of people who have access to your Google Search Console.
From, here you can add or remove people who have permission to see your GSC Reports.
Also, you can remove people from here whom you don’t want to have access to your Google Search Console.
Submit Feedback
This section doesn’t show any data related to your website or app.
But, you can submit your feedback or suggestions regarding the Google Search Console along with screenshots to Google.
About the New Version of Google Search Console
This tab also has no information or data regarding your website. But, if you want to learn anything about the new version you can type your questions in the search box.
In this tab and you will see a list of answers related to your question.
Go to the Old Version of Google Search Console
If you don’t want to work in the new version of the Google Search Console, you can switch back to the old version by clicking on this tab.
But, this is just for the time being while Google is migrating the data from the old version to the new version.
Once data migration is complete from the old version to the new version, probably Google would remove this tab.
Conclusion
If you want to grow your website traffic and conversions organically, you would need to get your SEO right, and to do that you need to follow Google’s guidelines.
Act as per Google’s recommendations and make your site follow their guidelines.
Using the free Google Search Console you can learn more about your website, its issues, and areas for improvement. You can fix the issues and get love from Google and get better ranks for your website.